
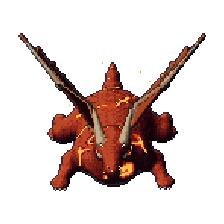
The Crimson Wyrm
Boss
- Lv 60
- Attacks on sight
- The Caldera
Where it lives
The Caldera
It lives in Emberhearth.
Fight
Health 124,817
The fight (tap to show)
- Mechanic damage
This boss's marks deal a fixed amount set for its level (60), in place of the blow multiples below: a move you could dodge 876 damage, a hazard 766 damage, its signature failed 1,204 damage, burning ground 263 damage a second. More levels and better gear mean more health, so the same hit takes a smaller part of it. Armour, shields and barriers turn aside at most 20% of it.
- Crimson Claw
Every 6 s it claws whoever holds it within 3.5 tiles (1.2 × a normal blow) and stacks Crimson Claw on them (10% more damage taken a stack). At 5 the claw rises: 1.5 s later 6.1 × a normal blow, if they are still in reach. One out of its reach for 3 s loses the stacks, and it beats its wings: a ring 4 tiles round it, 2 s ahead.
WhenEvery 6 s while it is on the ground (phases 1 and 3).
TipSwap at 3–4 stacks with a taunt; alone, step out of reach for a moment and out of the wings' ring.
- Wyrm Breath
A long 70° cone, 8 tiles, at whoever holds it; 1.6 s ahead: 5 × a normal blow and Dragon Fire for 8 s (it can be cleansed, or it runs out).
When7 s into the fight, then every 12 s.
EnragedEvery 10 s.
TipThe one holding it keeps its face away from the party; everyone else stands at its sides.
- Tail Sweep
Anyone behind it for 2 s draws its tail: a 120° cone behind it, 5 tiles long, 1.5 s ahead: 3.3 × a normal blow.
WhenWhenever someone stays 2 s behind it (at most every 6 s).
TipStand at its sides, not behind it.
- Ember Rain
A circle 2 tiles round follows each of 1/3/5 of the party for 3 s (1, 2–3, 4–5 players), stops, and lands 1.5 s later: 2.2 × a normal blow.
When10 s into the fight, then every 20 s.
TipSpread out, then step out of your circle once it stops.
- Flight and Deep Breath
It takes to the air for at most 40 s: out of reach, its shadow over the hall. 3 Deep Breaths, every 8 s: from one side a third of the hall glows for 2.5 s, then everyone in it takes 876 damage. Its wyrmlings come down from the nest (2/3/5; 1, 2–3, 4–5 players). It lands in the middle once they are dead (or the time is up): a ring 5 tiles round, 2.5 s ahead, 3.9 × a normal blow; it eats each wyrmling left (+3% health each).
WhenAt 70% of its health.
TipMove to another band when one glows; kill the wyrmlings fast; leave the middle before it lands.
- Overflow
The side channels glow for 4 s, then flood 3 tiles into the hall for 15 s: 263 damage a second and slowed by 50%.
WhenFrom 40% of its health, every 30 s.
TipKeep to the middle while the channels run over.
- Wing Buffet
It rears for 2.5 s, wings wide; then everyone within 9 tiles of it is thrown 5 tiles straight away from it. Where you will land is drawn at your feet (a white arrow and ring) the whole wind-up. Thrown against a wall you crash into it: 1,204 damage; landed in an overflowing channel's strip, you burn there.
WhenEvery 18 s on the ground (phases 1 and 3).
TipRead the ring at your feet; when it rears keep the channels in front of you, never at your back. Whoever holds it walks back after the throw.
- The Last Storm
It leaps to three sides of the furnace in turn (numbered 1, 2, 3 on the floor) and rears on each: three buffets in a row while the channels run over. Its health holds until it comes. Then it lies tired for 10 s, taking 50% more from every blow.
WhenAt 6% of its health.
TipBefore each leap, stand where its throw lands you in the middle of the hall; then everything at it while it is tired.
- Hard enrage
Its time is up: it goes berserk, its blows 2 × as often and 200 % harder, to the end of the fight.
When10:00 into the fight, whatever its health (its bar counts it down).
TipBring it down before the time runs out.
- Rage
It flushes red and rages: its normal blows come 1.3× as often, and all its blows are 15% harder.
WhenAt 40% of its health; it lasts to the end of the fight.
TipThe last part is the most dangerous: save your strong skills and potions for it, and dodging the marks matters more than ever.
Drops
Chest and signature (tap to show)
 Adamantite oreDrop× 1–2Always
 Boss Stone (Redpeak)DropOften
 Dragon's bloodDrop× 1–2Always
 Exalted health potionDrop× 2–3Always
 Exalted mana potionDrop× 1–2Always
 Mithril oreDrop× 4–8Always
 SapphireDrop× 1–2Always
 WyrmflameSignatureSometimes


 The chest's table32 pieces · Seldom
- Ancient cedar bowChestSeldom
- Ancient cedar staffChestSeldom
- Ancient cedar talismanChestSeldom
- Cedar bowChestSeldom
- Cedar staffChestSeldom
 Cedar talismanChestSeldom
 Drake-hide beltChestSeldom
 Drake-hide bootsChestSeldom
 Drake-hide breechesChestSeldom
 Drake-hide glovesChestSeldom
 Drake-hide hoodChestSeldom
 Drake-hide quiverChestSeldom
 Drake-hide vestChestSeldom
 Firesilk hoodChestSeldom
 Firesilk robeChestSeldom
 Firesilk sandalsChestSeldom
 Firesilk skirtChestSeldom
 Firesilk wrapsChestSeldom
 Mithril bootsChestSeldom
 Mithril breastplateChestSeldom
 Mithril daggerChestSeldom
 Mithril gauntletsChestSeldom
 Mithril greavesChestSeldom
 Mithril helmChestSeldom
 Mithril longswordChestSeldom
 Mithril shieldChestSeldom
 Mithril swordChestSeldom
 Mithril-buckled beltChestSeldom
 Sapphire-hilted daggerChestSeldom
 Sapphire-hilted swordChestSeldom
 Sapphire-stitched robeChestSeldom
 Sapphire-studded drake-hide vestChestSeldom
 Anvilsworn · Epic1 pieces · Sometimes
- Anvilsworn BreastplateSet pieceSometimes
 Anvilsworn Hunter · Epic1 pieces · Sometimes
- Anvilsworn Hunter VestSet pieceSometimes
 Anvilsworn Sage · Epic1 pieces · Sometimes
- Anvilsworn Sage RobeSet pieceSometimes
 Anvilsworn Saint · Epic1 pieces · Sometimes
- Anvilsworn Saint RobeSet pieceSometimes
 Anvilsworn Shade · Epic1 pieces · Sometimes
- Anvilsworn Shade JerkinSet pieceSometimes
 Anvilsworn Swordmaster · Epic1 pieces · Sometimes
- Anvilsworn Swordmaster BrigandineSet pieceSometimes
Quests
No quest asks for it.